Cut the crap & get to the point:
File > Batch conversion… > Advanced > Add overlay text > Settings
__________________________________________________
![]() Numero uno: Get IrfanView and its plug-ins. <–clickety click!
Numero uno: Get IrfanView and its plug-ins. <–clickety click!
(note: Download the “ALL Plug-Ins as one large EXE” as recommended by IrfanView.)
Now install IrfanView. Then install the plug-ins. Very simple process.
Why IrfanView? I’ve mentioned a little about it in my ‘killer softwares I use‘ post.
IrfanView has been one of the most powerful but simple softwares out there. It’s only 1.3MB + another 8MB of codec plug-ins. With this, it can almost play any media there is out there. From various photo format including RAW to videos to MP3s. If I have an unknown media that I want to play, I always run IrfanView first. Though its prowess and main function remain in photo viewing and editing. There is just so many neat tricks that it can do. All there is to do is search the web, or explore it yourself.
Back to batch watermarking. (Here’s for you, Debbie and other debutantes)
__________
Run/start/open IrfanView.
File > Batch conversion/Rename… B (or just press the ‘B’ shortcut button)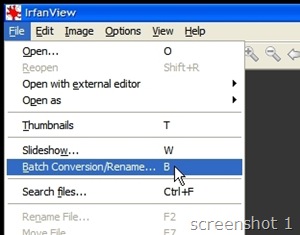
__________
This is the batch conversion dialogue window.
Top right is to select the photos you want to process. Bottom right is the photos added that will be processed.
On the left side now. The top: ‘Batch conversion’ is to do the conversions and replacing the original file. ‘Batch rename’ will copy the files with new names into the folder you specified (it will replace your original file if you choose to use original name in the same folder). ‘Batch conversion – Rename result files’ will do whatever conversion you specified, and then put them into a folder you choose with a new name.
Looking at screenshot 2, the file name I used was ‘xw$N’… ‘DSC_4754 Viennese Ball KL 08 – 62’ —> ‘xwDSC_4754 Viennese Ball KL 08 – 62’.
__________
Now that you’ve added the photos to be process, selected the output directory… it should look like this:
Click ‘Options’ in the ‘output format’ box. I normally use 100% to ensure there is not lose of quality every time I save a picture. I only select 90-95% when it is the last step and I want to limit its files size (which incidentally is the resize step too).
Select ‘Use advanced options’ then click ‘Advanced’ (where the mouse pointer is located)…
__________
… and a new dialogue window will appear:
Crop: I don’t use it to batch crop my photos. Each photo is different, so I use Lightroom instead. But you’ll never know, it may come in handy one day. =)
Resize: Besides watermarking, I wanted to resize the photos for Facebook. Facebook only displays up to 600 pixels wide (horizontal). A larger photo takes more time to upload. Select ‘set long side to:’ , type in 600 (or whatever you like) on the box next to it, and choose ‘pixels’. Inches and cm is too unpredictable because it depends on DPI… too mah fan to count.
Select ‘Preserve aspect ration’, if not your photos will come out squeezed or stretched.
Load & save setting: You can save all these adjustments (crop, resize, change colour depth, misc., etc) and load them later. Can save multiple adjustment setting for future use!
Change colour depth: Un-select, unless you want your photos’ colour to become cartoons/comic.
Add overlay text (mouse pointer): Use this for watermarking. Select it and click ‘Settings’
Other setting on right column: I don’t bother because my photos are already marinated and baked before this.
__________
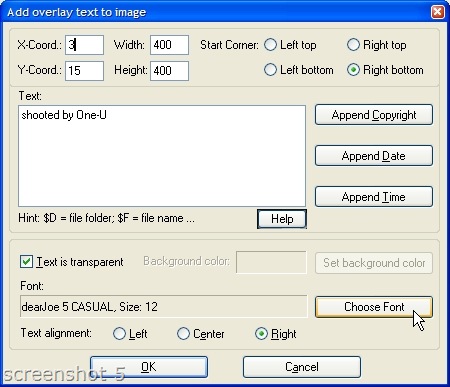
I wanted my watermark on the bottom right. Then I typed in my signature and chose my font. Note that the larger your photos, the bigger the font size you need. Size 12 on a 6 megapixel photo (3008 x 2000) is virtually invisible.
The ‘X & Y-coord’ is how far the text will be from the edge of the photos. Note I entered 15 (pixels) for ‘Y-coord’ (you’ll see later).
As for ‘width’ & ‘height’, go as big as possible. This is how big the area your text can appear. If the ‘Width’ is too small, your text will be wrapped into several lines or get squeezed.
Make sure ‘Text is transparent’ is selected. If not you’ll get a coloured/white/black box with words inside.
Now click ‘OK’!
__________
Click ‘OK’ for the ‘advanced’ option dialogue box too.
Almost there…
Back to the ‘Batch conversion’ dialogue box. Check the ‘output format’ options, the ‘rename settings’, make sure the ‘output directory’ are all correct.
Click ‘Start Batch’…
__________
Processing…
It’ll show you what it’s doing during processing. If you have a same photo in the folder, the ‘warning’ will show that the files have not been processed.
__________
At last… 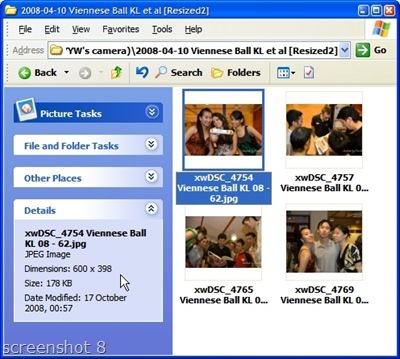
Notice the file name? ‘xw’ is added to the front of the name.
Also notice that a 3008 x 2000 photo has been resized to 600 x 398 pixels. If I had use 90% (in jpeg options), the file size might be around 100 KB, easy to upload to Facebook.
Here’s how the real photo looks like after resize and watermarking…
Note: remember the number ’15’ I entered on Y-coord and ‘3’ on X-coord (screenshot 5)?
The watermark is 15 points away from the bottom, and 3 points away from the side.
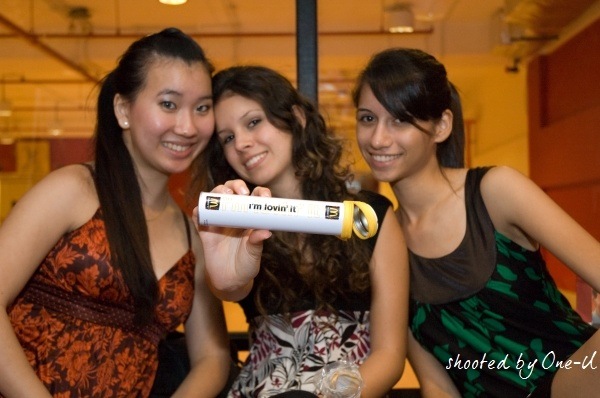
Three gorgeous debutantes from the Viennese Ball KL 2008 graciously modelled for this photo.
That’s Sara, Lisa and Catherine.
Oh, did I mention that I’m also a debutante too? W()()t!
Waltzing about,
the Débutante/


Tiu Nia Sing, Long live King Edmund…….NOT
cool. nice site. keep it up.
Really helped. Thanks.
“Shooted by One-U”
>Shooted.
have done all but watermark is not complete?
only the last 1 or 2 characters appear.
wassup?
Thank you so much! I’m hardly a noob but I was forced to use other software just to watermark although I’d had Irfanview installed since, what, 2002? This is definitely one of those headslappingly Eureka moments. From now on, I shall follow you!
Shooted? LOL English fail
Shooted is not a word, the word is “shot”
use english the right way or don’t use it at all… actually keep using it, you’re fun to laugh at
=) LOL! My oh my, you Americans. Sarcasm PHAIL.
I’m sorry that the nuances of satire escapes you.
I would’ve thought that anyone who read the whole article would figure out that I’m reasonably fluent in English & I have assumed poetic/artistic license to use the word “shooted” instead of “shot”. English is often spoken incorrectly here, so I’ve taken the liberty use the word “shooted” as a satire on broken English I hear daily.
I certainly did not expect a failed attempt by an bumbling egoistic idiot trying to make fun of me over this ‘mistake’. Hah hah! Well, seem like the joke is on you, ‘friend’.
Besides, ever heard of counter-signaling?
Keep dumping your superiority complex/bloated ego over here… you’re a lot of fun to laugh at.
Response WIN!
WOW, your an ass! i never understood why people like you feel the need to insult other people just because they are misused a word. how about you try to write in his language then we can all laugh at you. This guy is trying to help, find something else to do with your time!
very nice page. Thanks much.
This article bring a great support in preparing my ask-answer site (http://asknguyen.com). Before that, I have to use other program to add watermark to my post’s images before going to Ifranview to optimize them.
Thank you one more.
I don’t have a clue what to do or how to do it! it all sounds like greek to me… lol
just waiting for plug-ins to finish downloading and then I’ll try to figure it out again…
thanx anyway ;)
Thanks allot iamyuanwu i had this this software for a long time i think since i know how to use computer.:P but i didn’t figure it out this power. it solved my problem just in seconds..:)
text isn’t transparent. Also in the newer version, does no have transparent text option anymore.
BTW wonderful post and informative.
quick and helpful. thanks
Thanks, this was very helpful.
Thank you very much for writing this. I have been using irfanview for years and I did not know how to do this. This is great stuff.
Thank you for this excellent “how to” for Irfanview. A friend recommended it to me and it’s worked a charm. I have a question though about the text wrapping in the watermark. My name seems to wrap so my surname is under my first name as a watermark. Just curious as the sizing is 14 font and it appears wrapped on all size photos. Wonder if there’s a simple solution. I’ve tried the “Help” also but came up with nothing :(
Kind regards, Sarah.
Don’t worry – found the solution right there in the text. Thanks again :)
Kept having the issue of squeezed text but it’s solved thanks to your post. Many thanks
Thanks for another informative web site. The place else may I get that type of information written in such
a perfect manner? I’ve a venture that I’m just now running on, and I have been at the
glance out for such information.
Simply wish to say your article is as surprising.
The clarity in your submit is just great and i could think you are an expert on this subject.
Fine along with your permission allow me to seize your RSS feed
to keep up to date with impending post. Thanks
1,000,000 and please continue the gratifying work.
Does your blog have a contact page? I’m having a tough time locating it but, I’d like to shoot
you an e-mail. I’ve got some creative ideas for your blog you might be interested in hearing. Either way, great website and I look forward to seeing it develop over time.
I tend not to leave many responses, however i did some searching and wound up here Guide: Batch watermarking photos in IrfanView
4.20 | Victim of a Cereal Killer. And I do have 2 questions for you if
you don’t mind. Could it be simply me or does it give the impression like a few of these responses look as if they are coming from brain dead individuals? :-P And, if you are posting on other online social sites, I would like to keep up with everything new you have to post. Could you make a list of all of all your community sites like your twitter feed, Facebook page or linkedin profile?
I seldom create remarks, but i did some searching and wound up here Guide: Batch watermarking photos
in IrfanView 4.20 | Victim of a Cereal Killer.
And I do have 2 questions for you if you tend not to mind.
Could it be simply me or does it look as if like some of these remarks appear like written by brain dead folks?
:-P And, if you are posting on other online social sites,
I would like to follow anything fresh you have to post.
Could you make a list of every one of all your communal sites like your linkedin profile, Facebook page
or twitter feed?
THANK YOU!!!!! for this tutorial. you saved me from 132 migrains using PicMonkey, what a joke. and to think I alread had infranview on my PC, just didn’t know I could use it this way.
Thanks! It has helped me a lot but, in addition to your explanation, I’ve seen a new option in last version (I ignore if it was included in some previous version): add watermark image!
Very useful indeed. Thank you very much!
Very helpful, thank you!