Cut the crap & get to the point:
File > Batch conversion… > Advanced > Add overlay text > Settings
__________________________________________________
![]() Numero uno: Get IrfanView and its plug-ins. <–clickety click!
Numero uno: Get IrfanView and its plug-ins. <–clickety click!
(note: Download the “ALL Plug-Ins as one large EXE” as recommended by IrfanView.)
Now install IrfanView. Then install the plug-ins. Very simple process.
Why IrfanView? I’ve mentioned a little about it in my ‘killer softwares I use‘ post.
IrfanView has been one of the most powerful but simple softwares out there. It’s only 1.3MB + another 8MB of codec plug-ins. With this, it can almost play any media there is out there. From various photo format including RAW to videos to MP3s. If I have an unknown media that I want to play, I always run IrfanView first. Though its prowess and main function remain in photo viewing and editing. There is just so many neat tricks that it can do. All there is to do is search the web, or explore it yourself.
Back to batch watermarking. (Here’s for you, Debbie and other debutantes)
__________
Run/start/open IrfanView.
File > Batch conversion/Rename… B (or just press the ‘B’ shortcut button)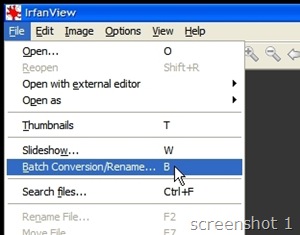
__________
This is the batch conversion dialogue window.
Top right is to select the photos you want to process. Bottom right is the photos added that will be processed.
On the left side now. The top: ‘Batch conversion’ is to do the conversions and replacing the original file. ‘Batch rename’ will copy the files with new names into the folder you specified (it will replace your original file if you choose to use original name in the same folder). ‘Batch conversion – Rename result files’ will do whatever conversion you specified, and then put them into a folder you choose with a new name.
Looking at screenshot 2, the file name I used was ‘xw$N’… ‘DSC_4754 Viennese Ball KL 08 – 62’ —> ‘xwDSC_4754 Viennese Ball KL 08 – 62’.
__________
Continue reading ‘Guide: Batch watermarking photos in IrfanView 4.20’


